


Generating Angular API clients with Swagger
In this article, we will take a look at swagger codegen. It will save you a ton of work and pain by generating HTTP services automatically from your swagger API description.
Note: There is a newer version of this article available: Generating Angular API clients with OpenAPI Generator
Swagger is the world’s largest framework of tools for the OpenAPI Specification (OAS). If you haven't added Swagger to your backend until now, you should do it now! It's the de-facto standard for re-usable and maintainable APIs. The toolset greatly eases the pain of documenting and interacting with APIs. It’s literally a Swiss army knife for all things APIs.
But in this article we are not going to talk about your backend. Let's assume your API is specified with Swagger and that we can focus on your Angular frontend. I'm pretty sure nobody wants to write boring plumping code by hand and manually sync changes between backend and frontend over and over again. So, how can we use the API documentation to generate code automatically?
Hello swagger-codegen
The official tool for code-generation is the Swagger Code Generator.
It supports a various range of target languages.
The list of supported languages and frameworks is growing constantly: all available languages
We are interested in the typescript-angular code generator, of course.
Don't be afraid!
Yes, the tool is written in Java.
But our final Angular code will not include any piece of Java at all. I promise you!
First of all, you need the compiled generator: swagger-codegen-cli.jar.
You can download the latest version from the following location: swagger-codegen-cli-2.3.1.jar
At the time of writing, v2.3.1 was stable.
If you need a snapshot of the development version, then take a look at: 2.4.0-SNAPSHOT
Right now you want to grab the snapshots. I have prepared PR that adds AOT-compatibility (via ng-packagr) to the Angular-Templates. This is huge! 😄
General usage
The idea is the following:
The code generator inspects the OpenAPI specification and writes a perfect API client for you.
That's it!
No more work by a human.
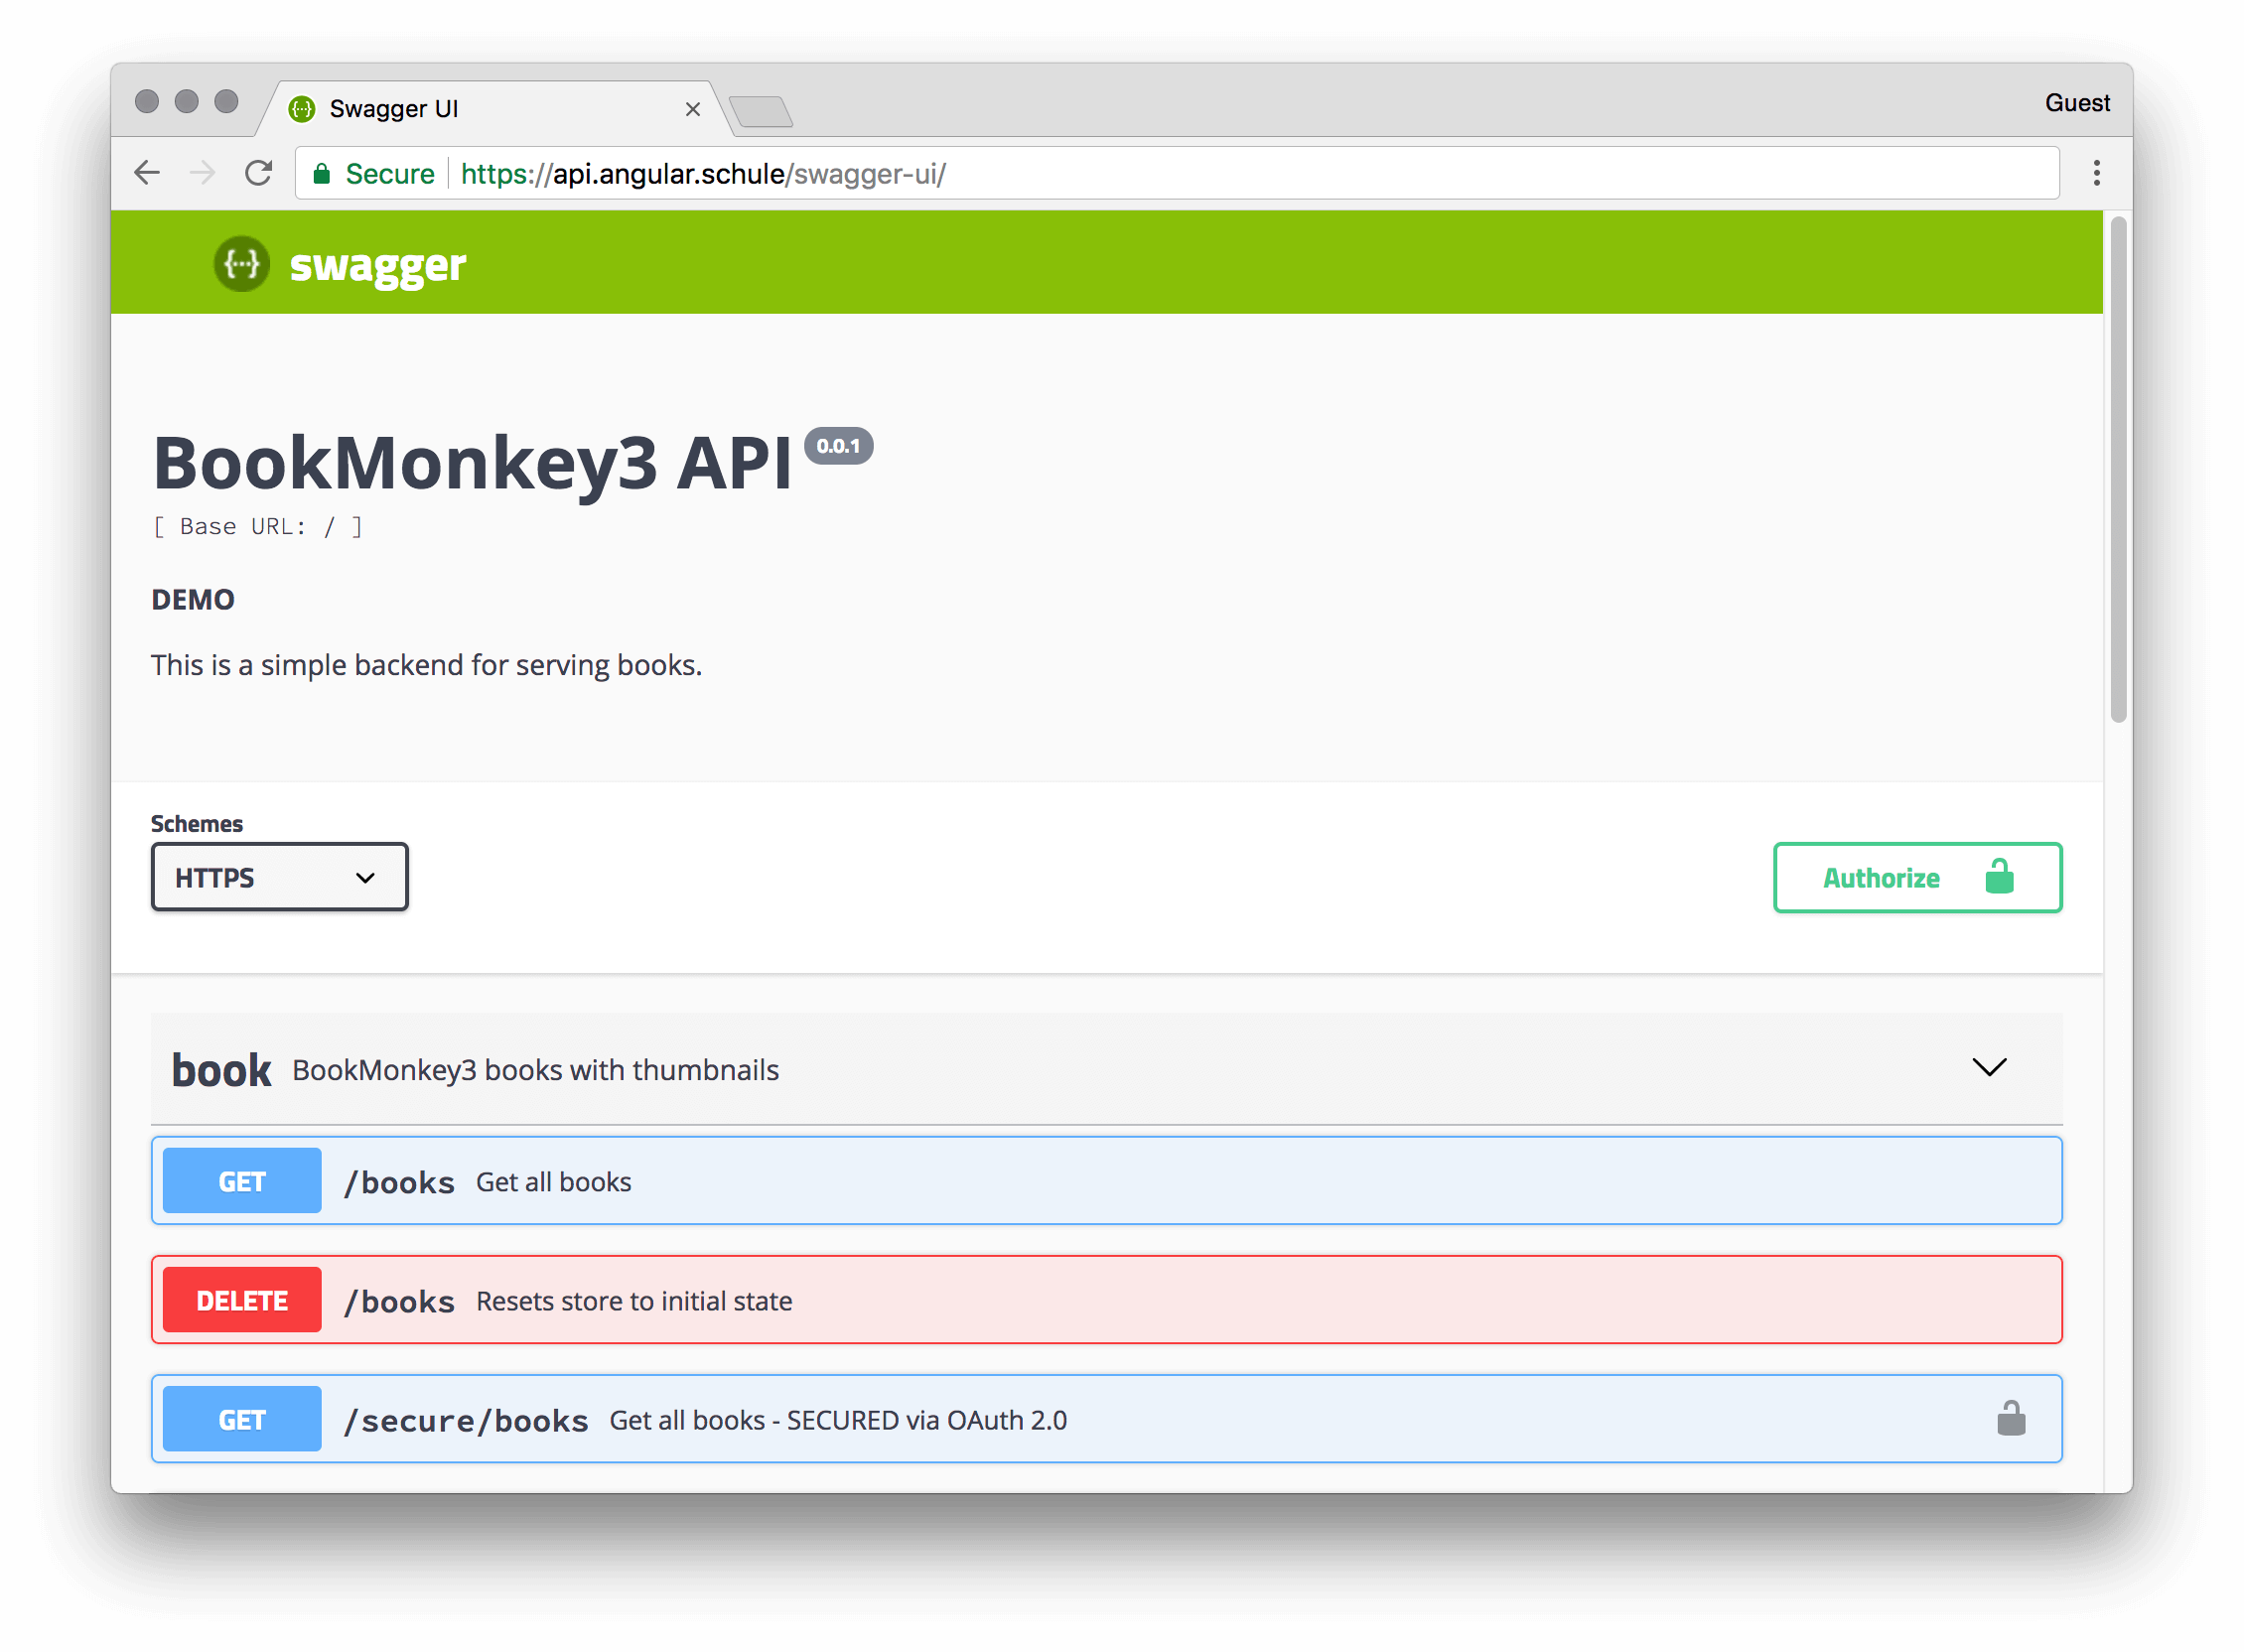
In this article we will use the following API:
Please feel free to explore it via Swagger UI.
Swagger codegen has a plenty of arguments to adjust. The minimal command line arguments are:
java -jar swagger-codegen-cli.jar generate \
   -i https://api.angular.schule/swagger.json \
   -l typescript-angular \
   -o /var/tmp/angular_api_client
(Note: Windows users will have to write this without the backslashes and in one long line.)
-ior--input-specdefines the location of the input swagger spec, as URL or file (required)-lor--langdefines the client language to generate (required)-oor--outputdefines the output directory, where the generated files should be written to (current dir by default)-cor--configdefines the path to an additional JSON configuration file. Supported options can be different for each language. We will look at this argument in the paragraph.
Please type java -jar swagger-codegen-cli.jar help generate for a full explanation.
Generating code for angular
We should explore the configuration options for the angular-typescript codegen.
These options are specific to the generator.
java -jar swagger-codegen-cli.jar config-help -l typescript-angular
You will have to adjust the following options:
npmName: The name under which you want to publish generated npm package.
Hint: You have to define a name here, or some files related to a proper npm package will be skipped and the generatedREADME.mdwon't make that much sense! This is by design, see also #6369.npmVersion: The version of the generated npm package. (default 1.0.0)npmRepository: Use this property to set a URL to your private npm repository in the package.json. I really recommend setting the option, if you want to prevent accidental publishing to npmjs.com. (see publishConfig)snapshot: When setting this totruethe version will be suffixed with-SNAPSHOT.yyyyMMddHHmm. This is very handy if you want to have unique package names to publish.ngVersion: The version of angular that will be required by the generatedpackage.json. It's a good idea to align this version with the angular version of your main app. The default is4.3. A version smaller than 4.3 yields to the generation of the obsolete HttpService (German blogpost).
This is a complete example for our demo api:
java -jar swagger-codegen-cli.jar generate \
   -i https://api.angular.schule/swagger.json \
   -l typescript-angular \
   -o /var/tmp/angular_api_client \
   --additional-properties npmName=@angular-schule/book-monkey-api,snapshot=true,ngVersion=5.0.0
I wonder why the command line argument was called additional-properties! There must have been historical reasons... 😄
As already pointed out, you can also define the additional properties (=== options) via a config file.
This cleans up the command a bit:
{
  "npmName": "@angular-schule/book-monkey-api",
  "npmVersion": "0.0.1",
  "snapshot": true,
  "ngVersion": "5.0.0"
}
java -jar swagger-codegen-cli.jar generate \
   -i https://api.angular.schule/swagger.json \
   -l typescript-angular \
   -o /var/tmp/angular_api_client \
   -c options.json
Don't accidentally publish to npmjs.com! 🚨
There is a minimal danger that you accidentally published your top-secret API client to the public npmjs.com repository! Please choose between one of the two options to prevent this:
- Set the
npmRepositoryoption. This will define apublishConfig.registryentry in thepackage.json. - Use a
npmNamewith a scope (e.g.@angular-schule/book-monkey-api) By default, scoped packages are private on npmjs.com. You have to explicelty make them public with--access=public. A scope can be easily redirected to a private registry, too. See this document for more information.
What's inside the box?
We should take a look at the generated files:
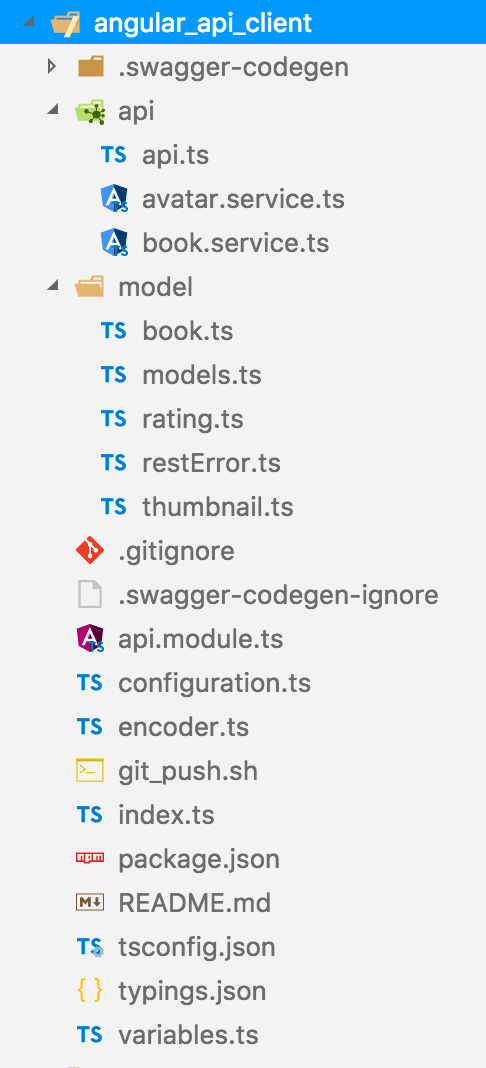
You will see that this is a complete angular project with all required config files and typescript files to create an angular package. It's a crazy world and unlike every other angular package we have to compile this again.
To install the required dependencies and to build the typescript sources run:
npm install
npm run build
Now everything is prepared to finally publish the package to NPM or a private repository.
npm publish dist --access=public
Consuming the API with @angular/cli
now navigate to the folder of your consuming Angular project and run
npm install @angular-schule/book-monkey-api --save
It's generally a good practice to extend the src/environments/*.ts files by adding a corresponding base path:
// src/environments/environments.ts
export const environment = {
  production: false,
  API_BASE_PATH: 'https://api.angular.schule'
};
The shortest possible setup looks like this:
// src/app/app.module.ts
import { HttpClientModule } from '@angular/common/http';
import { ApiModule, BASE_PATH } from '@angular-schule/book-monkey-api';
import { environment } from '../environments/environment';

@NgModule({
  declarations: [AppComponent],
  imports: [
    HttpClientModule,
    ApiModule
  ],
  providers: [{ provide: BASE_PATH, useValue: environment.API_BASE_PATH }],
  bootstrap: [AppComponent]
})
export class AppModule { }
You have to import both: the HttpClientModule from Angular as well as our generated ApiModule. You might wonder why HttpClientModule is included here. One could think that ApiModule should do that import for us, but this can lead to a strange but intended behaviour of Angular (see issue #20575).
The usage of the generated API is straightforward.
Every REST operation has its own method.
For example, if we want to get a list of all books, then we can simply import the BookService and call the corresponding method.
// src/app/app.component.ts
import { BookService } from '@angular-schule/book-monkey-api';

@Component({
  // ...
})
export class AppComponent {
  constructor(bookService: BookService) {

    bookService
      .booksGet()
      .subscribe(console.log);
  }
}
Conclusion
🎉 Congratulations! We have mastered a journey for automatically generated api code. Your project will benefit from less errors and more harmony between team members, who can concentrate on real solutions instead of boring boilerplate code.
Now it should be your task to automate the code generation on you CI system.
On every (relevant) change of the backend you should also generate a new client.
To upgrade to the latest version in your consuming Angular project, you just need to call npm install PACKAGE_NAME --save again.
You can find the full setup of the swagger codegen here:
- demo-api-codegen/swagger-codegen
- which produces this npm package: @angular-schule/book-monkey-api
The following Angular demo app is using the package @angular-schule/book-monkey-api:
Have fun doing awesome Angular stuff! 😄
Related Articles
- 2018-06-08 - Swagger Codegen is now OpenAPI Generator
- 2018-06-10 - Generating Angular API clients with Apollo and GraphQL code generator
Extra: Using own templates
Sooner or later everybody wants to customise some aspects of the generated code. You can change most parts by modifying the mustache-templates.
-tor--template-dirdefines a folder containing own template files. If specified, those templates files will be used instead of the inbuilt versions. You can start by modifying the original ones from Github.
Extra: Building the codegen from the sources
You might want to use the very latest version directly from Github. Or you might want to contribute to the codegen -- that would be a great idea! All in all, a first start isn't that complicated, since everything is nicely prepared with Maven.
git clone https://github.com/swagger-api/swagger-codegen.git
cd swagger-codegen
mvn clean install
We are using the master branch, some unit test might be broken.
Or you just want to save some time...
Anyway, mvn clean package -Dmaven.test.skip will skip the tests. ;-)
Maven will create the necessary Java archive at the location modules/swagger-codegen-cli/target/swagger-codegen-cli.jar
Now you should have created a snapshot version:
java -jar modules/swagger-codegen-cli/target/swagger-codegen-cli.jar version
> 2.4.0-SNAPSHOT
It's important to know that you have to use Java 7 or 8. It won't compile with Java 9.
Right now it's fine to install Java 8 as instructed in the README of swagger-codegen. This should be fixed some day! 😉 Just for the records, on my Mac I executed the following workaround:
brew cask install caskroom/versions/java8

export JAVA_HOME=`/usr/libexec/java_home -v 1.8`
export PATH=${JAVA_HOME}/bin:$PATH

java -version
Keywords:SwaggerCodegenTypeScript
Anregungen? Feedback? Fehler?